
Start your wrapping journey now!
There's a first time to everything.
If you've been considering wrapping your vehicle, now is the perfect time to start! You can find multiple videos and tips online now which makes it much easier to learn. Understand that your first project will be challenging, and mistakes will happen, but it's through mistakes that you learn!
Please visit our FAQ page to learn more important details about your wrap.
Tools and accessories
First up you will need some good tools at hand. Here's a list of what we believe are necessary:
- Squeegee with a soft buffer.
Important not to choose a cheap option, as low-quality buffers can cause scratches to appear prematurely. Any squeegee will do, but a good buffer is key.
- Precision knife with extra blades.
Have a box of 30° snap-off blades on hand. When wrapping a full vehicle, you will need multiple blades. We recommend chipping your blade on every cut to avoid mistakes made by a dull blade.
- Heat-gun
Fortunately, you don't need a top of the line heatgun to wrap. Any retail or hardware store will sell some sort of decent heatgun that will do the job. Avoid battery heatgun, go with a wired one.
- Magnets
While magnets could be an optional choice, we believe they can make your life easier, especially if you're a solo installer. A set of 4 good magnets will be sufficient for most projects.
- Measuring tools
Any measuring tape will do the job. It's important to measure each panel precisely and cut strategically to minimize material waste. Try to plan your panels carefully. For example: most bumpers are around 30" by 100" meaning you can cut both the front and rear bumpers from the same 100" sheet by dividing it into two sections (since each roll height is 60").
----------
Here's a list of what we believe are optional tools:
- Tack reducer
Using a tack reducer can be very helpful for large flat panels like hoods, roofs, and trunks. It’s a great tool for beginners. This product reduces the aggressiveness of the adhesive, making it easier to reposition and avoid trapping air. We recommend 'Triple S'.
- Tucking tools:
These little precision tools will help achieve a better finish. They can be especially helpful in tight spots where a big squeegee can't reach. Also great for corners.
- Knifeless tape:
Although knifeless tape is a crucial tool for a wrap, I would still consider it optional. However, if you want the straightest lines, this tool is a must-have.
- Soft gloves:
One of my favorite accessories to have. It helps you apply gentle pressure without relying on your squeegee. It's great for avoiding lines and preventing extra scratches caused by a worn buffer.
- Vinyl cutter (snitty)
This tool is quite helpful and is often included in most all-in-one wrap tool kits. However, I would list it as optional, as you can always cut excess vinyl with your knife.
- Extra lighting
Definitely optional, but a very helpful accessory. Adding extra spotlights here and there will give you a better view of your cuts, helping you avoid uneven cuts and mistakes.
Preparation and Installing
Good preparation is very important, take note of these steps!
- Wash your car
Thoroughly wash your car with quality products, avoiding wax-based soaps as they can reduce vinyl adhesion. If your vehicle has been ceramic coated within the past 12-24 months, the coating must be removed. Look up online for instructions on how to remove ceramic coating.
- Decontaminate the surface
Use iron remover and decontamination products otherwise small contamination dots may show underneat your wrap! Follow up with a claybar to secure a clean surface.
- Let the car dry
Important! If you're not in a hurry, we recommend letting your car dry for a full day. Start a day in advance to reduce the chances of water being trapped in seals and leaking, which can contaminate the adhesive.
- Clean up the surface
Select your first panel to wrap, starting with the hood is a good idea to test out the vinyl first. Clean the panel with 70% isopropyl alcohol, making sure to clean every corner, inside and out. Also, ensure adjacent panels are clean to avoid contamination during installation.
- Prepare your vinyl
At this point, its time to measure and cut your vinyl. We recommend leaving an extra 3 inch on each sides to avoid being too short on one side.
- Tack reducer (optional)
Before placing your vinyl on your surface, apply a good amount of tack reducer on a micro-fiber and wipe the general surface (AVOID CORNERS). Great for flat pannels. Great for beginners.
- Place your vinyl
Finally, place your vinyl on the surface. Center it, leaving approx 3 inch excess on each sides and secure it with your magnets. Before removing the release liner, cut off any excess, such as around the wiper area on the hood and the wheel wells on the front and rear fenders.
- Post-heating
The most important step. When the vinyl is applied along the surface, prepare your corners and stretched areas. Before cutting, test your vinyl with high-heat on stretched areas to make sure they are well done. If not, the vinyl will pull back and create 'fingers'. After securing these areas, cut your excess vinyl. When everything is done, it's time to post-heat. Apply high-heat to your stretched areas, up to 85-100° celcius (185-210°F). This will kill the memory effect and secure it. Look up 'post-heating' online for more information.
After Care
After finishing your project, here are some tips to take care of your vinyl.
- Store the excess
Keep your excess material on the original roll. Do not remove it to re-roll separately, as this can cause tunneling. If you have excess material or planned cuts, it’s crucial to remove the transparent protective sheet. Otherwise, there's a high risk of the vinyl separating from its release liner, leading to tunneling. Tunneling creates a permanent mark on the vinyl where the liner separated, which typically cannot be restored. For more details, look up 'Tunneling' online.
- Curing
It is preferable to let your vinyl cure for a few hours (or days) before washing or delivering. Letting your car rest in a warm area (preferably warm sunlight) will activate the glue and test your stretched areas. If there are areas that weren't post heated or over-stretched, these will fail in the following hours. For more information, look up 'Post-heating' online.
- Washing
Congratulations! If you've reached this step, you've completed your project. Now, it's time to take care of your vinyl long-term. It's as important as keeping your paint nice and clean. The secret for a long-lasting wrap is to keep it away from rough UV exposure and harsh chemicals. We recommend hand washing your wrapped vehicle at least once a week to prevent contaminants sticking.
- Soaps
Avoid fast car washes, as they use cheap soaps with chemicals that can damage vinyl. Stay away from pH-aggressive soaps and waxes, as these will harm the vinyl. Also, avoid wax-based products and cheap quick detailers—use ceramic detailers instead. A helpful tip is to pre-wash your vehicle first to remove most of the dirt, preventing unnecessary swirls.
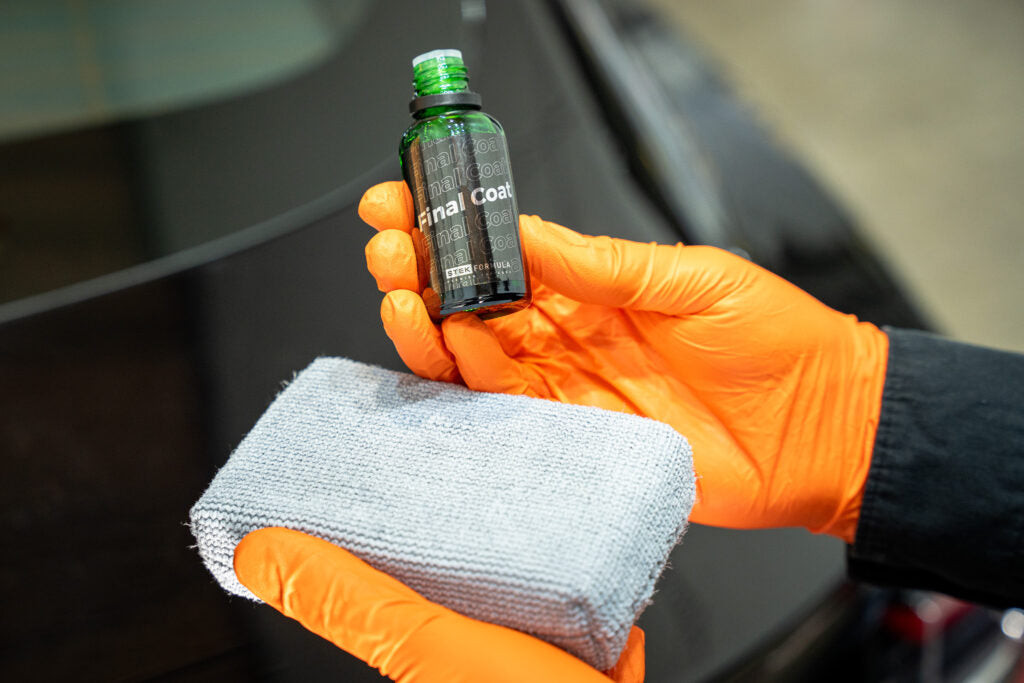
- Ceramic coating
The best option! We highly recommend applying a ceramic coating to your vinyl. It helps reduce UV damage, prevents premature discoloration, and creates a hydrophobic barrier that repels water and contaminants. We recommend having a professional apply the coating.
- Polishing
Polishing can be done on gloss-only wraps if the proper conditions are met. You'll need a good polishing machine with a gloss-only pad. It's crucial to use a 0/10 cut, 10/10 gloss cream, or you risk creating swirls. Use low speeds and gently polish the area. This technique is great for removing haze, contamination, and light swirls.
Please take note!
It is your responsibility to ensure that the products you use are safe for vinyl. Please do your research to choose the best products for proper care. We are not responsible for any damage caused by improper maintenance.
Enjoy your wrap!
If you have any additional questions or need further assistance, please don’t hesitate to reach out to us via email. We’re here to help and will be happy to provide the information you need.